Thesis: This is the high-level plan to create an affiliate site from scratch based on the Amazon Associate program. It will cover finding a niche market, content planning and creation, outreach and promotion, and growing the site.
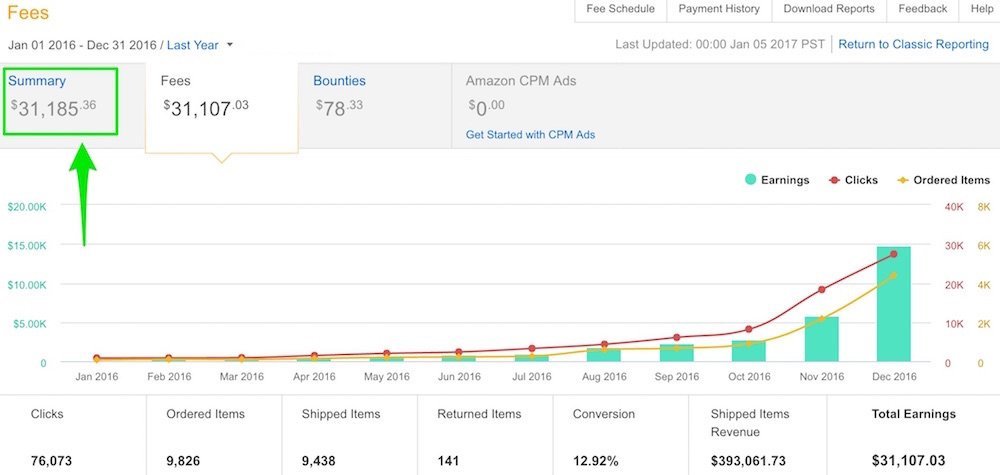
I logged into my Amazon Associate account, nervous. I knew I was getting more traffic than I expected and the earnings showed it.
It was crazy to even think about quitting my job, but I knew that Amazon Affiliate commissions could replace my healthy I.T. Project Management income.
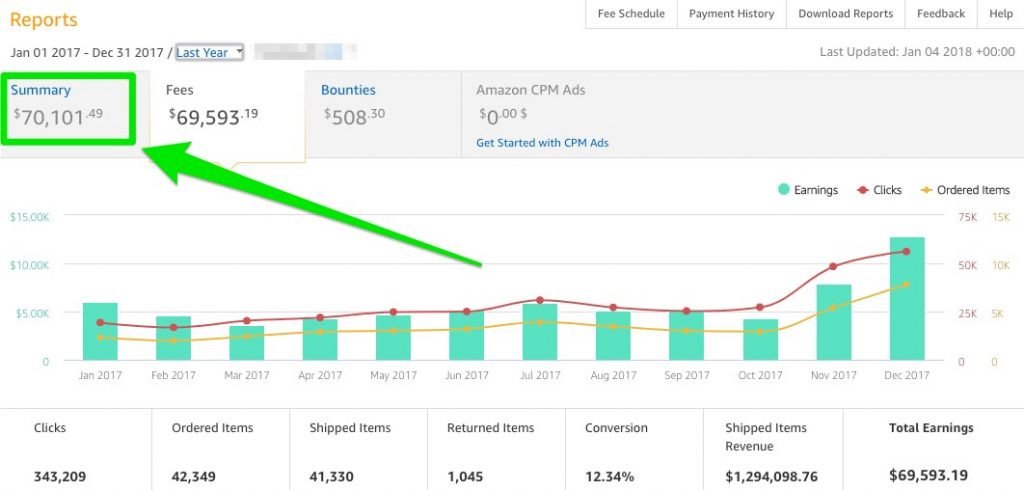
Things can escalate quickly…
The Beginning
Let’s go back to the beginning when I found the Smart Passive Income Podcast by Pat Flynn. That was my introduction to internet marketing and making money online. And to be perfectly honest, I thought it was a scam and couldn’t be real.
Over a few episodes and hearing Pat Flynn’s story I gained confidence in internet marketing.
Then I took action and started my first site. It was a failure and I made several mistakes, but I learned from them and kept pushing on. I didn’t have a clear blueprint and framework so there was a lot of guessing about what to do next.
This high-level plan will tell you how to start an Amazon Affiliate Site.
We’ll go over:
- The Basics of Affiliate Marketing
- Selecting a Niche or Market
- Building Your Website
- Publishing Content
- Outreach & Promotion
- Frequently Asked Questions about Niche Sites
This guide is enough to get you started with your own Amazon Affiliate Site. But if you want to supercharge your progress, check out Five Figure Niche Site, a premium course that uses a proven, repeatable framework.
The Basics
Affiliate sites are based on product reviews that help consumers choose the right product. The goal is to provide helpful information to the would-be buyer and they will eventually click on your affiliate link.
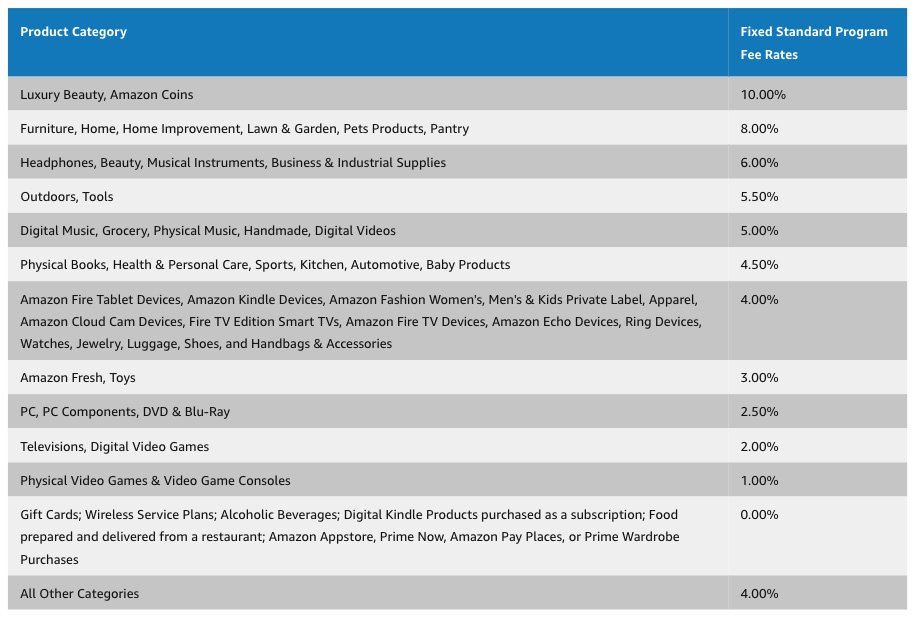
That link will take them to an e-commerce site to make a purchase, Amazon in our scenario.If the person makes a purchase, then you get a commission based on the category of the product — anywhere from 1% to 10%.You get a commission on anything they buy, not just the product you linked to.
Amazon converts very well since they understand what people buy and what people shop for. So even though the commission rate is potentially lower than other programs, Amazon is a great choice for most niches, experienced webmasters and bloggers, and people just starting out in making money online.
Here are a few recent success stories.
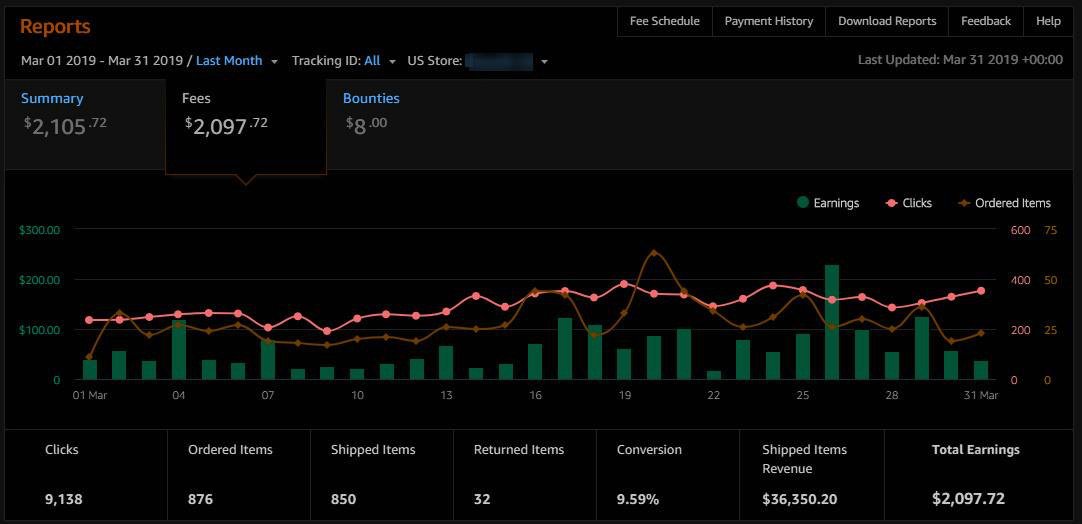
- Marty hit over $3,000 in a single month, May 2019. He said this, “It’s hard to describe, to be honest with you. It’s just like a wonderful surprise, it makes you just feel good for all the hard work you’ve put in…”

Here’s the screenshot of when Marty hit $2,000 in March.
- In under a year, Christy made $400 in April, over $500 in May, and over $750 in June. Her site continues to grow.
- Madhusree got laid off in 2018 and is currently making over $500 per month. Madhusree used concepts we’ll cover soon to turn a site that looked like it was failure into a site that is worth over Five Figures.
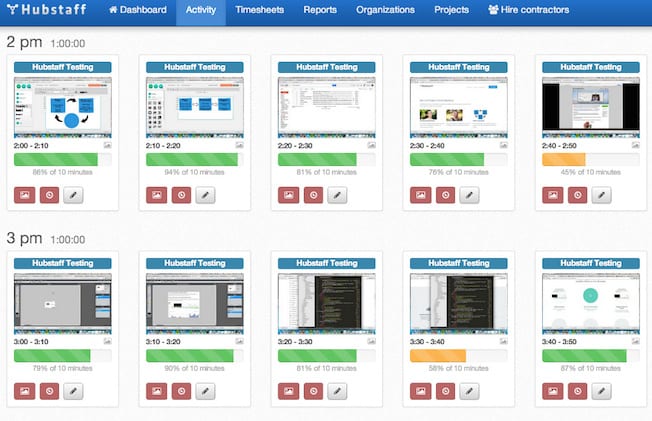
Here is a screenshot of recent earnings from Madhusree.

Marty, Christy, and Madhusree all worked very hard but it’s definitely paid off. They learned a massive amount about marketing and, of course, they have assets worth many thousands of dollars.
They aren’t limited by the number of hours they can work anymore — the sky’s the limit now.
Let’s talk about starting from the very beginning — Choosing a niche and market.
Select a Niche or Market
You need to find some products that people are actually buying. People need to be researching the products as well.
So you need to:
- List out some categories and products.
- Determine if there are enough people searching for the products using keyword research tools.
List Categories and Products
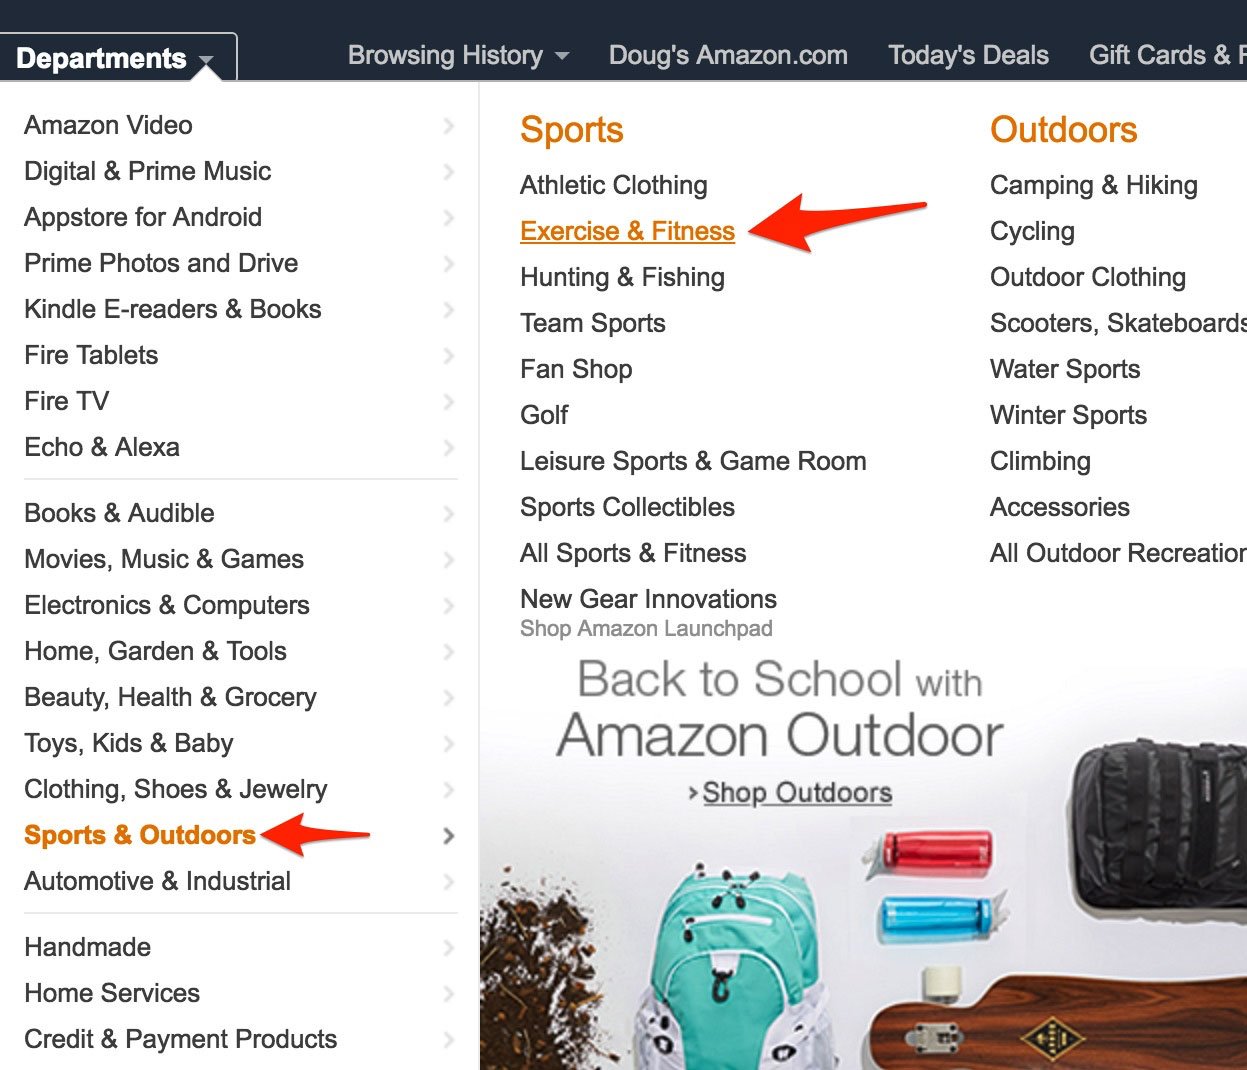
The fastest way to come up with products is to start right at the source — Amazon. It’s free to do and I think it’s pretty fun.
Head to Amazon and start navigating the Departments. You’ll probably gravitate to categories and products that you enjoy already.
Check out other Departments and sub Departments that you aren’t familiar with. As you go deeper, you might find some obscure and unusual products that you didn’t even know existed. Maybe you’re into fitness.
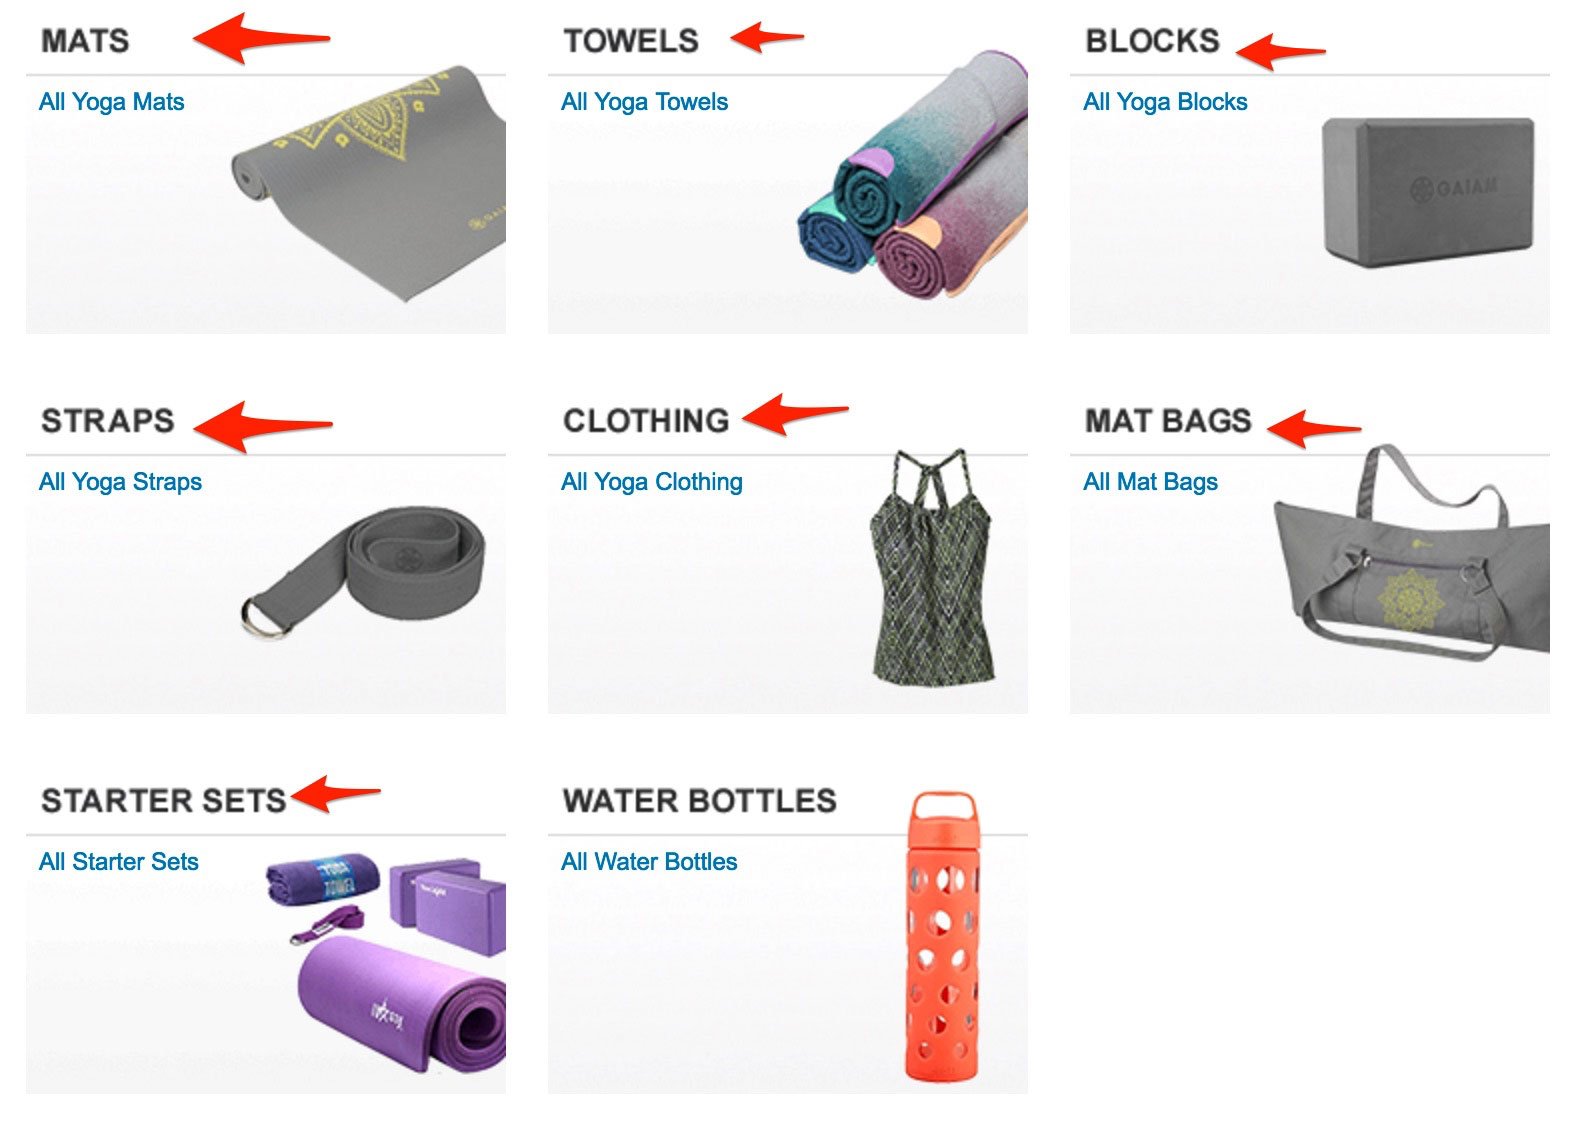
Start listing out products that you find, even products that seem too basic or too advanced. Sticking with the fitness example, perhaps you like Yoga.

Then you can dive down to specific products. And you can see this process can be simple, interesting, and take so many paths as you browse around.
Any Amazon Department will have plenty of products that are selling at a sufficient volume that you can make a niche about anything.
The essential part is to make sure that people are researching the products prior to buying.
Keyword Research
So we need to talk about keyword research. You need a tool to check the keyword search volume — that’s the approximate number of times per month that people on the internet search on Google for the term.
There are some free tools, like Keywords Everywhere and Ubersuggest, and paid tools, like KWFinder or Long Tail Pro, that can give you the data you need.
The search volume is an estimate and tools use different algorithms to generate the reported search volume. Even though search volumes are an estimate, they provide us with a sense of the relative popularity of a keyword phrase versus another.
So just pick a tool to use and stick to it. There’s no value in trying to figure which keyword research tool has the most accurate search volume — it’s impossible to determine.
Is the niche big enough?
You’ll need to check the search volumes in your tool of choice. You should look for search volumes in the 500 – 10,000+ per month range. You can make a full-time income with just 2 or 3 keywords with this search volume, and you can always add more content.
Look for long tail keywords that follow the Keyword Golden Ratio or KGR. I’ll explain the KGR later.
Look for these other signs for a viable market:
- Other affiliate sites in the top 20 results of Google
- Active blogs
- Active Facebook groups and pages
- Active Instagram accounts
- Active Pinterest accounts and boards
- Active professional and amateur associations and clubs.
These are general guidelines and you may find that you can’t check all the boxes for many niches. So the more you find the better, and the real test is finding the keyword search volumes that fit the bill.
And there are great niches where you may not find many keywords with search volume over 500. But generally, if you follow the guidelines, you’ll find a niche with enough potential to be profitable.
The Keyword Golden Ratio
The KGR is the way to find keywords that can rank in Google in hours without backlinks.
The formula for the KGR is the number of Google results that have the keyword phrase in the title divided by the monthly search volume, where the search volume is less than 250.
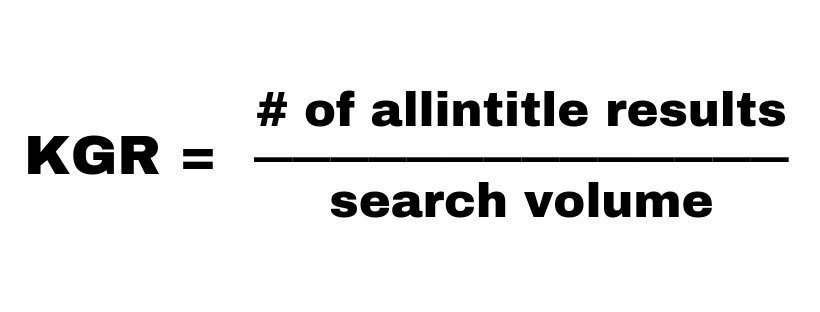
If the KGR is less than 0.25, then you should rank in the top 100 when your page is indexed.
You should still rank in the top 250 when the KGR is between 0.25 and 1.
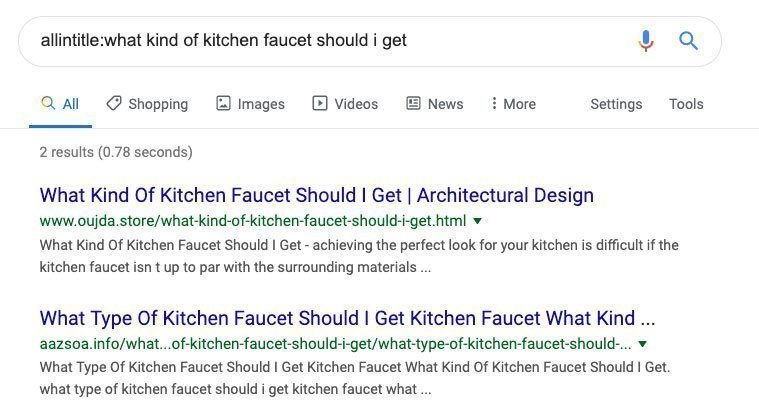
To find the number of Google results, you can use the advanced Google search, allintitle.
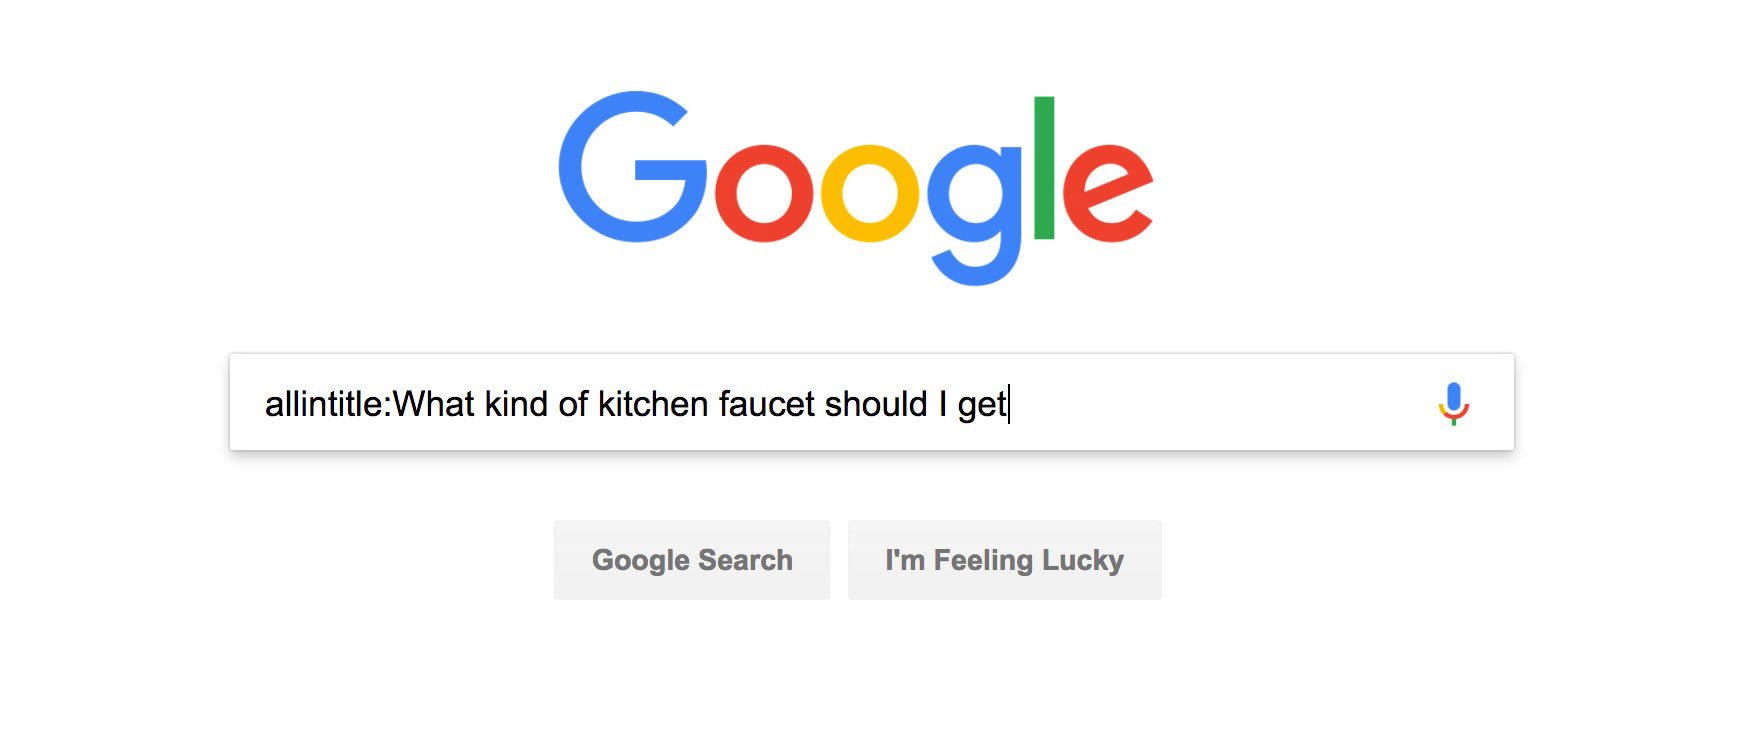
The number of results is 2 in this example.
I often hear from people brand new affiliate sites that get traffic weeks after starting a site by using the Keyword Golden Ratio.
Why 250 in the KGR? Why can’t I go for bigger searches??
It will take longer to rank if the search volume is over 250. Generally, higher search volume terms will have more competition. I have an unproven theory that Google takes longer to rank higher search volumes — there seems to be a strong correlation.
So stick with the KGR formula if you’re just starting out. Once your site has some momentum, then you can start experimenting more.
Four Types of Keywords
There are four keyword categories and it’s very important to target two types to get the right traffic on your site. You want people that are interested in making a purchase in the near future.
Here are the types:
1: Buy Right Now: Someone is probably going to buy in the next few minutes and their credit card is out. These aren’t good to target, though counterintuitive. These keyword phrases are usually dominated by e-commerce sites, not affiliate sites.
So if you Google a keyword and see the majority of the results are sites like Amazon, Walmart, Target, other big retailers, then you know that Google and searchers are looking for e-commerce results.
You’ll often see these words as part of a Buy Right Now keyword:
- For sale
- Coupon
- Coupon code
- Discount
- Deal
Example: “ballpoint pen coupon”
2: Buyer’s Research Keywords: These are the ones we want. Someone is doing research before buying a product, and you can imagine a time that you did research for a product. The person is earlier in the buying cycle than a Buy Right Now keyword.
I was researching a light laptop for travel and searched like this:
Best Chromebook for travel

You’ll often see these words as part of a Buyer’s Research Keywords:
- Best (as the prefix)
- Review (as the suffix)
- Top
Example: “best gel pen”
3: Informational Keywords: Most keyword phrases are informational in nature. People are researching a topic to learn more and often times they are trying to learn how to do something.
So those searchers usually won’t convert into affiliate sales most of the time.
And you might be thinking that your affiliate site should only have keywords with buyer’s intent, but that’s not exactly correct.
Both Google and Amazon want sites to have value and not just advertising oriented content. Google even penalizes sites for having thin content even if the content is long form and well researched.
That said, you can and should publish informational content on your site to get traffic for low competition keywords. I recommend about 50% affiliate content and 50% informational content to be sure your site is not considered thin.
You’ll often see these words as part of an Informational Keywords:
- How to
- The best way to
- Tips
- Strategies
Examples: “how to bullet journal” or “bullet journaling tips”
4: Generic Keywords: These are usually general in nature with a small number of words. A lot of times if you Google the term, you might see the Wikipedia page as the top result with other general results.
People are looking for the definition and if a purchase is made in the future, it’s probably really far in the future.
Consider my laptop dilemma from before — I started by Googling “Chromebook.” I wanted to learn more but I had no real knowledge after using Macs for over a decade.
It’s not normally beneficial to target these keywords since you’re unlikely to rank and the content is unlikely to be profitable for you.
Generic Keywords tend to be 1 or 2 words long.
Examples: “journal” or “dream journal”
Choosing a Niche
At the end of this phase, you should select a niche.
You should have a mix of Buyer’s Research and Informational Keywords.
You want to see some competition — other affiliate sites — no competitors is actually a bad sign.
You should have a good set of keyword golden ratio keywords so you can rank some content quickly and without the need for backlinks.
Once you have a niche, you can build your site which is a simpler prospect after keyword research.
Create Your Website
This phase is a lot more mechanical and process driven compared to selecting your niche. It should be a welcome break after all the keyword research.
Here are the 4 main steps:
- Select a Domain Name
- Set up a Hosting Account
- Select a WordPress Theme
- Install some plugins
Select a Domain Name
Choose a brandable domain that can fit many products in your niche. The days of an exact match domain are long gone. That would be a domain like:
bestballpointpenforjournalling.com
A domain like that limits your options for products in the future. Exact match domains used to be a way to “game the system” by stuffing keywords into the domain name, but it’s a mistake to do that nowadays. The Google algorithm is too smart for that and you want to have the option to expand your site and product reviews in the future.
So brand your site broadly and focus on a small number of topics and products early on. You can expand the topics and products in the future if you want, but you don’t have to.
In this ballpoint pen example, you can think about a level higher than just pens and think about all writing utensils. Then, when you think about the audience, you’ll realize that people that write with pens need something to write on — paper, notebooks, journals, etc…
Pens and paper are basically office supplies. Now, we’re onto a niche that you can really grow into if you choose.
So instead ofbestballpointpenforjournalling.com maybe penandpaper.com would be better. And for full flexibility for growth and brand-ability, maybe a name like these would be good:
- officesupplyguru.com
- penspaperandmore.com
Set up a Hosting Account
You need to have 1 click installation for WordPress and just about any premium hosting company will be fine. You should stay away from really cheap hosting, like $1-2 per month, because those are usually from resellers. Reseller support is usually very bad.
Technical support is where the benefits of a premium hosting company show up. When everything is working fine, then you can get by with cheap hosting.
But when you are making $400 per day and your site crashes, you need help fast. That’s when you need to be able to talk to a competent tech support person and not an unskilled customer service rep.
Select a WordPress Theme
I started my first site with the free, default WordPress theme from 2012. The site performed well making $6,000+ per month and I still adopt a minimal approach for themes.
Don’t spend too much time picking out a theme. If you don’t have a budget, use a free theme — like one of the several WordPress themes. Automattic (the parent company of WP) has many feature-rich themes that are free.
If you have a budget of $30 or more, you should consider a premium theme for a few more options. But I caution you about getting a theme that has a lot of options which sounds like weird advice.
The problem with a theme that has a lot of options, features, and added functionality is that each one of those is a decision point that will slow you down.
Some of the themes out there have pages of options that are confusing and require configuration. And if you end up changing themes in the future, which is common, some of those features will break in the new theme.
Keep it simple. Trust me.
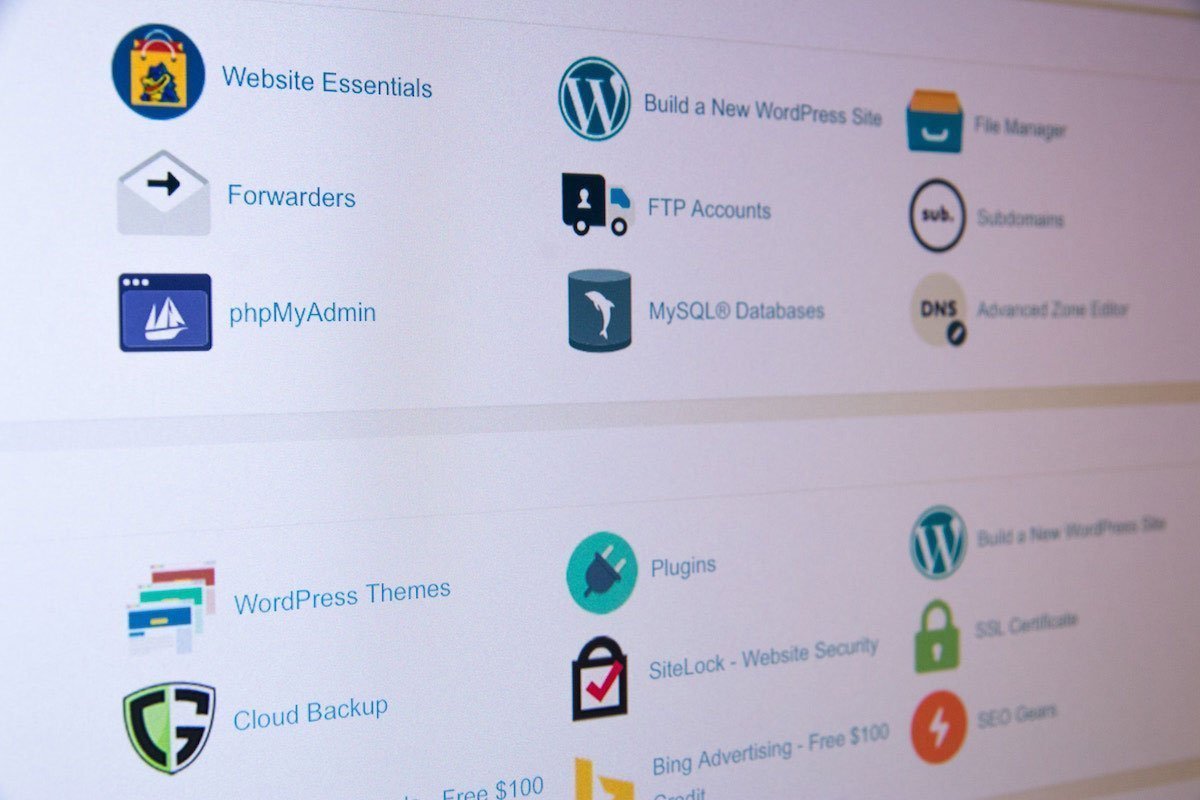
Install Some Plugins
WordPress has unlimited plugins that can do just about anything. It’s one of the reasons that so many sites use WordPress.
On my first site, I started adding a few plugins, then a few more to do this or that. Next thing I knew, my site took about 25 seconds to load. I couldn’t figure it out.
Plugins slow your site down. Some are faster than others but it’s generally a good practice to use plugins only when it’s required.
I recommend using 10 or fewer plugins — only the critical ones. My plugins center around security, backups, and reducing spam.
For example, you can use snippets of code to add Google Analytics versus using a plugin.
Here are 4 plugins I like:
- Akismet – Comment Spam
- Lockdown WP Admin – You can change the login page so your site won’t get so many brute force attacks.
- Manage WP – It’s really a service, but you need to have the plugin on your site. Off-Site Backups and migrating/cloning sites.
- Disclosure for Amazon Associates Plugin – The Disclosure for Amazon Affiliate plugin is the fastest and easiest way to get your Amazon Affiliate site fully compliant with both the:
- FTC and Amazon required Affiliate Disclosure
- Amazon Trademark disclaimer
You can use other plugins that do similar things and I’m not tied to any of them specifically.
You don’t need any specific plugin for Amazon Associates. They are out there, but it’s totally optional and I recommend that beginners use the default tool from Amazon called the Site Stripe.
You can always change your theme in the future and add more plugins so keep it simple.
Publish Content
People should read your content on the way to Amazon to make a purchase. Your goal is to provide information to help the visitor make a decision about what to buy
Here are the main steps:
- Create a list of topics using the keywords from your research.
- Write the content yourself or outsource it if you have the budget.
- Publish the content.
Topics
You should have a list of keywords which serves as your list of articles. While some people talk about huge authority sites, you should start small so you don’t get overwhelmed.
So don’t worry if you hear about people that have 100 or 300 or 700 keywords to start with. All sites start with zero articles and grow from there.
So you only need about 10 to 20 keywords to start. If you can start with that, then you’ll be able to find more keywords in the future.
You should select keywords based on a few criteria:
- 50% should be informational or how-to based keywords.
- 50% should be product related reviews.
- Most of the keywords should be keyword golden ratio compliant.
You want to keep the 50/50 balance so that Google and Amazon are happy about the helpful nature of your site, i.e.not thin content.
KGR compliant content will get you traffic faster. You want the traffic, yes, but the psychological benefit of getting traffic early is even more powerful.
Writing the Content
You have two main types of content: informational and product reviews.
The informational content is basically an essay so you can think of it as an article that you’d see online. So if you’re totally stuck, then Google the keyword phrase and check out the results. You’ll see the structure and style of writing which you can emulate. Don’t copy it, of course, but you can use multiple sources to get ideas.
For the product reviews, you can use this general outline and format for your product reviews. It’s modular and adaptable for any number of products.
- Article Title: Usually the keyword phrase with something catchy to entice the searcher to click on the result. Look at headlines to get ideas
Example: Best Ballpoint Pen (and what you need to know) - Intro: Engage the reader with your review. I like to qualify the visitor and get them to think, “yes, I’m in the right place…”
Example: Looking for the Best Ballpoint Pen? You’re in the right place… - Image: Again, you want the visitor to think they are in the right place.
Example: An image of a ballpoint pen - Comparison Table: Tables are a great way to convey a lot of info in a small space, especially if there are technical specs to share. You can see some great examples at Amazon (below). If there aren’t tech specs, you could still give a comparison of the features, quantity, and so on.
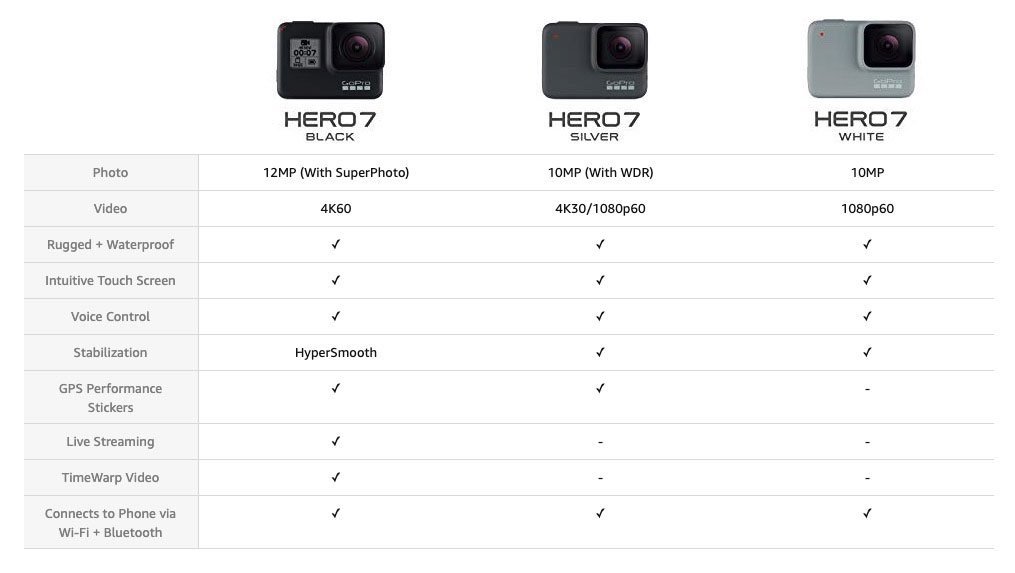
Example
- First Key Feature: Mention the top features a buyer should consider. It can be a short section or paragraphs depending on the complexity of the products.
Example: Ink Color – These pens come in many different colors including black, blue, red, and green. - Second Key Feature: I like to mention at least two features and add as many features as I can. You can review the Amazon product description or user manual for products to get ideas.
Example: Writing Thickness – These pens come in many different thicknesses including 1 mm, 0.7 mm, and 0.5 mm. - Mini Reviews: Write about each product that you’re featuring and mention how they stack up to each of the features. I always mention the pros and cons. By mentioning the cons, your content will have more credibility. Even the best products have downsides.
Example: Pilot G2: It’s a great pen and one of the most popular for journaling and office workers.
Colors: You can get 6 different colors for a G2. (and so on)
Writing Thickness – G2s come in many different thicknesses including 1 mm, 0.7 mm, 0.5 mm, and even ultrafine at 0.375 mm. (and so on) - Conclusion: You can mention your top choice or generally summarize the article.
Example: My favorite pen is the Pilot G2 due to the economic price, durability, and ability to but refills almost anywhere. If you’re on a tight budget, then you should consider the Exicomm MX.
Publish the Content
You have your content so now you can publish it. There isn’t a complicated strategy for a publishing schedule. I just publish as soon as a post is done.
You don’t gain any advantage or get a ranking boost from publishing content on a regular basis. If you hear someone publishing every week or every day to get more traffic or better rankings, it’s an out of date piece of information. It could have been the case a few years ago, but the Google algorithm doesn’t care how often you post or if you stick to a schedule.
I’ve published 20 posts in one day, then nothing for 10 months and it was fine. I publish content as quickly as I can so the content is indexed by Google as soon as possible.
You can publish on a regular schedule if it helps you, but don’t feel obligated to do so.
Don’t be scared to publish your posts. You can update them later if you need to, but don’t try to make it perfect. It’s impossible to get perfect and you can look at it as a living document.
Outsourcing Opportunity
If you have the budget, outsourcing the content will save a massive amount of time. Content Refined can write, format, optimize your content, and even load the content right into WordPress.
I’ve also hired many writers from Upwork — it’s economical but requires a lot more admin and management from you. Freelancers can disappear without a trace and it’s no fun dealing with flakey writers.
Outreach Promotion
Getting traffic to your site requires that it ranks well in Google. There are over 200 ranking factors, too many to mention here, but only two of them really matter:
- High-Quality Content
- Backlinks
You have high-quality content already so now you need the backlinks. A backlink is when another website links to a post on your site. It’s like a weighted vote for your site.
The more authority and credibility a site has the better the link from the site is. So if you can get a link from the New York Times website, that’s better than a link from a random blog that no one reads.
I like to keep it simple and use this simple 3 step process:
- Comment on blogs in the niche and related niches.
- Network with the bloggers after commenting, usually via email.
- Ask to guest post on their site.
Comment On Blogs
You can easily search for blogs that allow comments using Google. It’s best to think about the audience of your niche and understand what they are interested in. You want to find blogs that have a similar audience, but that aren’t direct competitors. Direct competitors probably won’t work with you.
So people interested in ballpoint pens and writing devices are usually interested in things to write on like paper, notebooks, and journals.
Here are a few relevant searches:
- “Leave a comment” bullet journal
- “Leave a reply” bullet journal
- “Leave a comment” journaling tips
- “Leave a reply” notebook for journaling
As you look at some of the sites, you’ll see other relevant topics to branch out from. Then, you’ll be able to develop your own searches based on what you observe about the blogs in the niche and the audience in general.
You should leave your name, domain name, and leave a relevant comment for the post. Do not put a link into the comment field since that can come off as spammy and the blogger may not approve the comment.
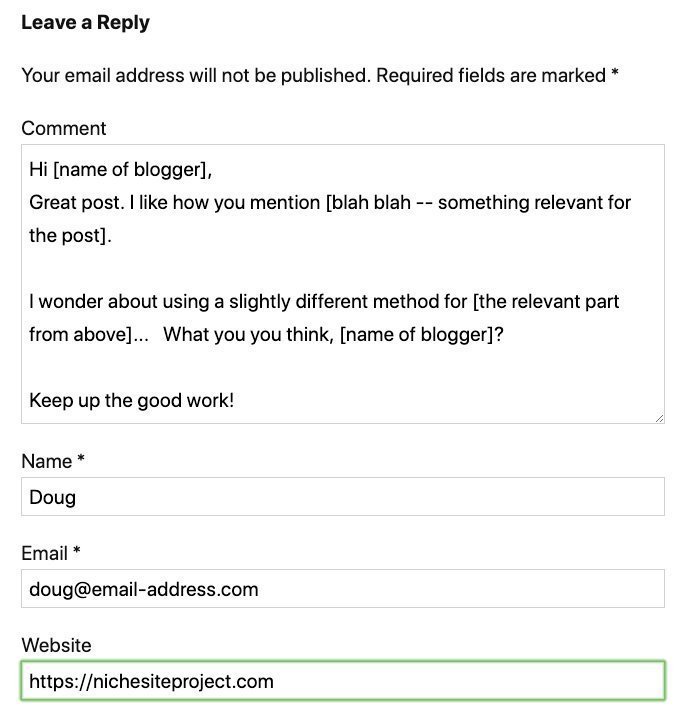
You’ll get a link to your homepage with your name as the anchor text. It won’t be a very powerful link, but the goal is to start networking within your niche.
I like to keep track of the blogs in a spreadsheet so I can go back to see if they are approved after a week or so. If the comment shows up, then I know it’s approved.
Networking
Blog commenting is the first step in networking. After I see that a comment is live, then I’ll look for the contact page or email address of the blogger so I can send a friendly message.
Your goal is to become an “online friend” of the blogger and that might take a few emails.
Here are some tips:
- Don’t ask for anything in the first 2-3 interactions.
- Be nice and polite.
- Compliment their content and be specific so they know you actually read the blog.
- Share some of their content on social media— choose the channel that they are most active and be sure to tag them.
- Be likable.
Ask To Guest Post
After you have built up the relationship with the friendly interactions, you can ask to guest post on the blogger’s site. I like to phrase it like this:
Hi, How are you? I wrote a post called, “7 Best Ways to Keep a Journal” and I was about to publish it on my site. But I thought it might be good to for your site.
No pressure, but would you be interested in publishing on your site as a guest post? I even mention 1-2 products so you can put in your own affiliate link.
Let me know what you think.
Thanks!
It’s low pressure and that message does two things:
- Gives the blogger a way to gracefully opt out.
- The mention of adding their affiliate links makes the idea more attractive since it could be an income producing piece of content.
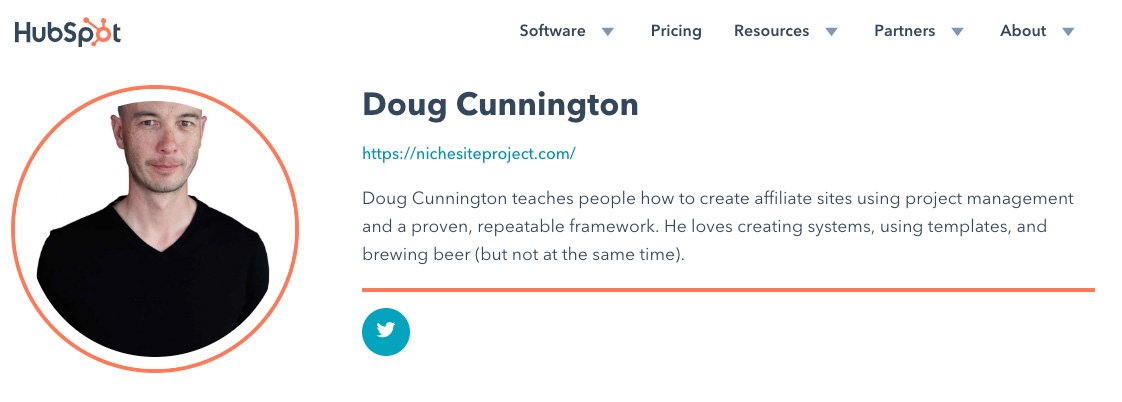
You should add a link to your site somewhere in the post. I like to add a link to the homepage of my site in the bio and a link to a specific post on my site in the body of the content.
Here’s a byline link from a guest post I wrote at HubSpot. I also included a link to a specific post within the content.
Outsourcing Opportunity
I like outsourcing the backlink process since it can be very time-consuming. There are a lot of services out there and you get what you pay for. So stay away from cheap vendors or services like Fiverr.
Frequently Asked Questions about Niche Sites
Here are some common questions that may be on your mind after learning about the process of creating a site from scratch. I have several FAQs here.
Should I start an Amazon Affiliate Site? It seems like there are so many out there already…
If you’re interested in the concept, then yes! You should try it out. It’s a permission question and you don’t actually need anyone’s permission.
You’ll see many other business models, like drop-shipping or Kindle publishing or Amazon FBA — and any of them can work.
All of them are competitive. And all of them can work for you. So it’s up to you to pick the best option for you.
The best piece of advice I can give you is that you should try something and take action. You can try different business models, but don’t do too many things at once.
How Much Do Niche Sites Earn with Amazon Associates?
It’s hard to answer this question accurately, but I’ll give you a range. Many sites never make any money because people don’t put in the work.
But if you do put in the time and effort, it’s not unusual to see a small site with 10-20 posts making about $100-$200 per month after about 6 months. The more work you put in, the more money you can make, just like any worthwhile endeavor.
If you go through the steps and dedicate yourself to working 5 hours per week or so, I have seen students make:
- $100/month within 4 – 6 months
- $1,000/month within 6 – 9 months
- $1,500 to $5,000++/month once you’re past the 9-month range.
After a year, the sky is the limit because growth accelerates when your site is older than 6 months. It’s all dependent on the amount of work that you do, like many things in life.
Do you use other affiliate programs? I know others pay a higher commission so why work with Amazon Associates?
I stick with Amazon Associates even with lower commissions because:
- Amazon converts to sales at a much higher rate than other programs.
- You get commissions on everything in the cart.
- Other programs don’t sell at the volume of Amazon.
So I make more money with Amazon than other programs because of the high volume of sales. I recommend that people test for themselves, but that’s my observation. If there is another affiliate program that you want to test out, then there is no harm in trying it out to see how profitable it is. Just make sure that you are staying compliant with Amazon’s regulations. You can find out how to do that here.
What’s Next
You have the high-level outline and plan. It’s the same exact framework that I use on my own sites. I’ve taught hundreds of students so I’m confident it’s a repeatable framework.
The hardest part is getting started. So take action and get started. Don’t worry about making mistakes — you probably will. Remember that you’ll learn from the mistakes so make sure you don’t make the same mistake twice.
If you’re interested in learning more, enroll in Five Figure Niche Site. Doug Cunnington created the course after years of testing and distilled down the process to manageable system. Enrollment opens up a few times a year, so jump on it when you can. You can learn about three of the most common mistakes here as well.